

The lower back is the most commonly injured area in the human body. About 80% of people will experience at least once incidence in their lifetime and nearly 10-20% live with chronic pain.
The common understanding when we have low back pain is that we must “strengthen our core”. For many, this means the abdominal muscles, which include the rectus and transversus abdominus, internal and external obliques. While strengthening these muscles can certainly be beneficial, thinking of this as “the core” is an outdated view and one that needs a bit of redefining.
The core consists of the muscles above but also those that help to stabilize the pelvis. This includes the psoas, erector spinae, multifidus, gluteus maximus, gluteus minimus and the adductors.
The multifidi are unique group of very small muscles that are able to produce a large amount of force over a compact area. This makes them ideal for stability as opposed to movement and thus they are key factors in lower back pain.
Studies have actually shows that people with chronic low back pain often have multifidus atrophy coupled with fatty replacement. Put simply, the muscles literally become fat due to lack of use.
For this reason, targeting the posterior chain—the muscles lining the back of your body—is crucial for working with any kind of low back injury. As Eric Goodman and Peter Park say in their fantastic book, Foundation, “For every exercise you do for the front of your body, you should do at least 4 for the back.”
Today I am going to show you three of my favorite exercises to give to patients with lower back pain.
The first of these is chair pose.
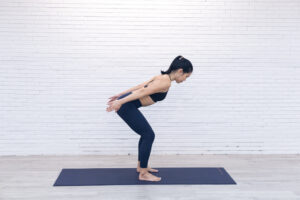 To practice it:
- Separate your feet hip width and make them parallel.
- Bend your knees slightly, take your arms behind you and shift your hips backwards.
- Shift back so that your weight is on your heels but not so much that your toes lift. Your toes should remain on the floor.
- Tilt your tailbone upwards to activate the lower back muscles (multifidus and erector spinae) more.
- Hold for 5 breaths, then stand up.
- Repeat 3 times.
This is one of the great poses for lower back pain. It strengthens the muscles and teaches you to keep the weight on your heels while also working on hip hinging, a necessary movement for everything from tying our shoe to sitting down on the toilet.
Next is locust pose:
I have a very specific way I teach this that I have found helps my patients immensely compared to the traditional pose.
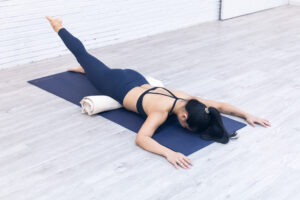
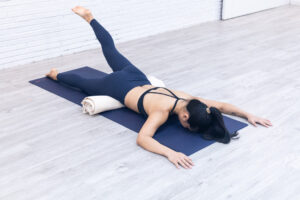
- Roll up a yoga blanket or a thick beach towel and lie face down on it. The blanket should be at your ASIS (Anterior Superior Iliac Spine) the two front hip bones of your pelvis. It should not hurt and should not be putting pressure on your abdomen.
- With your forehead down and arms over head, lift one leg into the air and hold it for 30 seconds.
- Repeat on the other side and do each side 3 times.
The purpose of the blanket is to elevate the pelvis and allow you to lift the leg higher, thus creating more lower back strength. It also prevents one of side of your pelvis from dropping when the leg lifts, a very common dysfunctional pattern for people with low back pain.
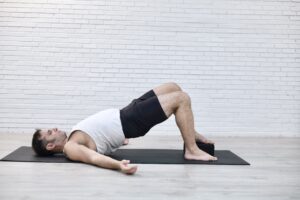
The 3rd is bridge pose with a couple variations:
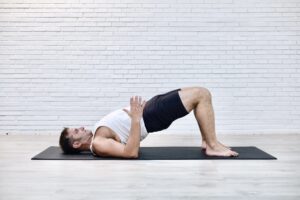
- Begin by lying on your back with the knees bent and feet parallel.
- Lift your hips but immediately put your mind on your heels (remember the heels from before?) You will find that normally the balance distribution between each heel is off. Balancing the weight on the heels prevents chronic pelvic misalignment.
- Once balanced, you can lift the hips higher.
- Hold for 30 seconds and repeat 3 times.
Next are two bridge pose variations that help to differentiate the strength between the glutes and help align the pelvis.
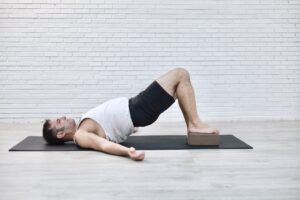
- Set up again for bridge pose but place on foot a yoga block (if you don’t have one, you can stack up a couple books).
- Lift your hips up into the air. In essence, this is a supported one legged bridge.
- Press the heel down of the foot that’s on the floor to strongly engage the gluteus maximus. Your foot that’s on the block should remain light.
- Hold for 20-30 seconds and repeat 3 times per side.
This simple sequence will help you whether you a dealing with acute or chronic pain. It is designed to stabilize the muscles of your back and make you stronger.
It is also part of larger program I have on back pain called, “Applied Yoga: What To Do When you Tweak Your Back”. This class is just 20 minutes long and goes over numerous techniques to alleviate pain. And once you join, you have the class for life. You can return to it year after year whenever you have discomfort.
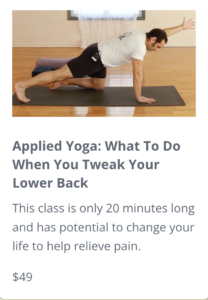
I am running a promotion on the course to the first 20 people who register so instead of $49 USD, you will get it for $29. When you go to checkout, add the code 20off and you’ll receive your discount.
Just click HERE to register.
Remember, the stronger and more mobile your back gets, the happier it will be.
Go to www.joryserota.com for more info.